Most game tutorials make you hand-place every sprite in code. The Game Builder flips that around: you draw the level visually, tag objects with the numbers your game needs (lives, value, speed), and the editor saves it as a small data file that the runtime plays. Your code shrinks to the part that’s actually yours — the rules.
This is the first of three tutorials. We’ll build Duke’s Coffee Run: a side-scroller where Java’s mascot Duke dashes right across a grassy floor, collects coffee cups for points, dodges roaming exception monsters, and reaches a flag to win. Along the way we’ll do the part most tutorials quietly skip — bringing in real art, including slicing an animated sprite sheet for Duke. By the end you’ll have a running game and understand every moving part: the assets, the level file, the generated companion class, the built-in arcade behavior, and where your own logic goes. Tutorials 2 (board game) and 3 (3D dungeon) continue the story.
Why a game builder?
A Codename One game is a GameView holding a Scene of sprites, driven by a GameInput. Building a level purely in Java means dozens of new Sprite(...) / setX/setY calls that you can’t see until you run them, and that you must recompile to tweak. The builder replaces that with a visual editor and a plain-data level file, so:
- Designers and developers can both touch the level — it’s data, not code.
- You iterate visually — drag a coffee cup, hit play, repeat — with no rebuild.
- The same file ships to 2D, isometric board, and 3D runtimes unchanged.
Step 0 — Create the project and scaffold a scene
The builder attaches to a Java 17 Codename One project. Creating that project and installing the toolchain are covered in the getting-started guide — generate one from the Codename One initializr (pick Java 17) and you’re ready. Then scaffold a scene and open the editor:
mvn cn1:create-game-scene -DclassName=com.example.coffeerun.CoffeeRun
mvn cn1:gamebuilder
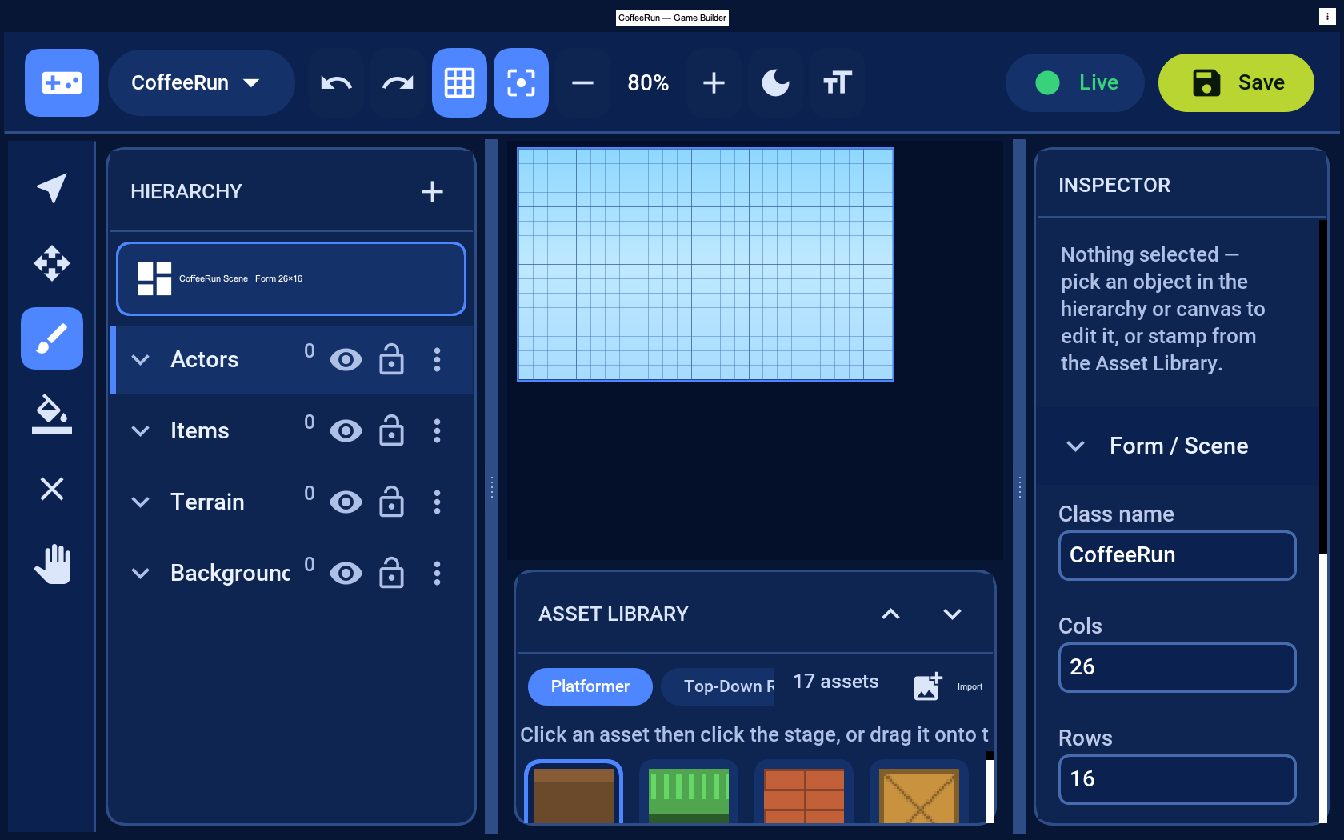
create-game-scene writes an empty CoffeeRun.game level and a CoffeeRun.java companion into your project (2D is the default; pass -Dmode=board or -Dmode=3d for the other tutorials), and cn1:gamebuilder opens the editor on it. Empty is the honest word: you get a grid, four layers, and the starter art packs — but no level laid out, and no Duke. Three panels matter: the Hierarchy (layers and objects), the Asset Library (the art you stamp down), and the Inspector (the selected object’s transform and behavior values). The layers — Background, Terrain, Items, Actors — set draw order (Background paints first) and let you hide or lock parts of the level while you work.
Step 1 — Get your art in
A real game starts with art, so let’s do that first instead of pretending sprites appear by magic. An asset is a reusable definition — an id (grass, coffee, player), a kind (a grid tile or a freely placed actor), default properties, and a pointer to its art file. Each art file is one of three formats:
- Image — a static
.png/.jpg→ aSprite(ground, coffee cups, mountains). - Sprite sheet — one image of equal frames in a grid plus a frame size and rate → an
AnimatedSpritethat plays the frames (Duke’s run cycle). - Mesh — a glTF/
.glbmodel → aModelin a 3D level (Tutorial 3).
The starter packs already include grass, coffee, an exception monster and even a Duke player, all as real image files you can open and replace — enough to build the whole game without importing anything. But the point of a tutorial is the real workflow, so we’ll bring in our own animated Duke.
Download the assets used here and drop them in your project’s src/main/resources/games/assets/ folder:
- duke_run.png — Duke’s 5-frame run cycle (already sliced and ready)
- coffee.png and exception.png — the collectible and the enemy
- duke_sheet_raw.png — the raw AI-generated sheet, to show what “integrating an asset” really involves
That raw sheet is what you usually start with — multiple animations, labels, padding, a solid background:
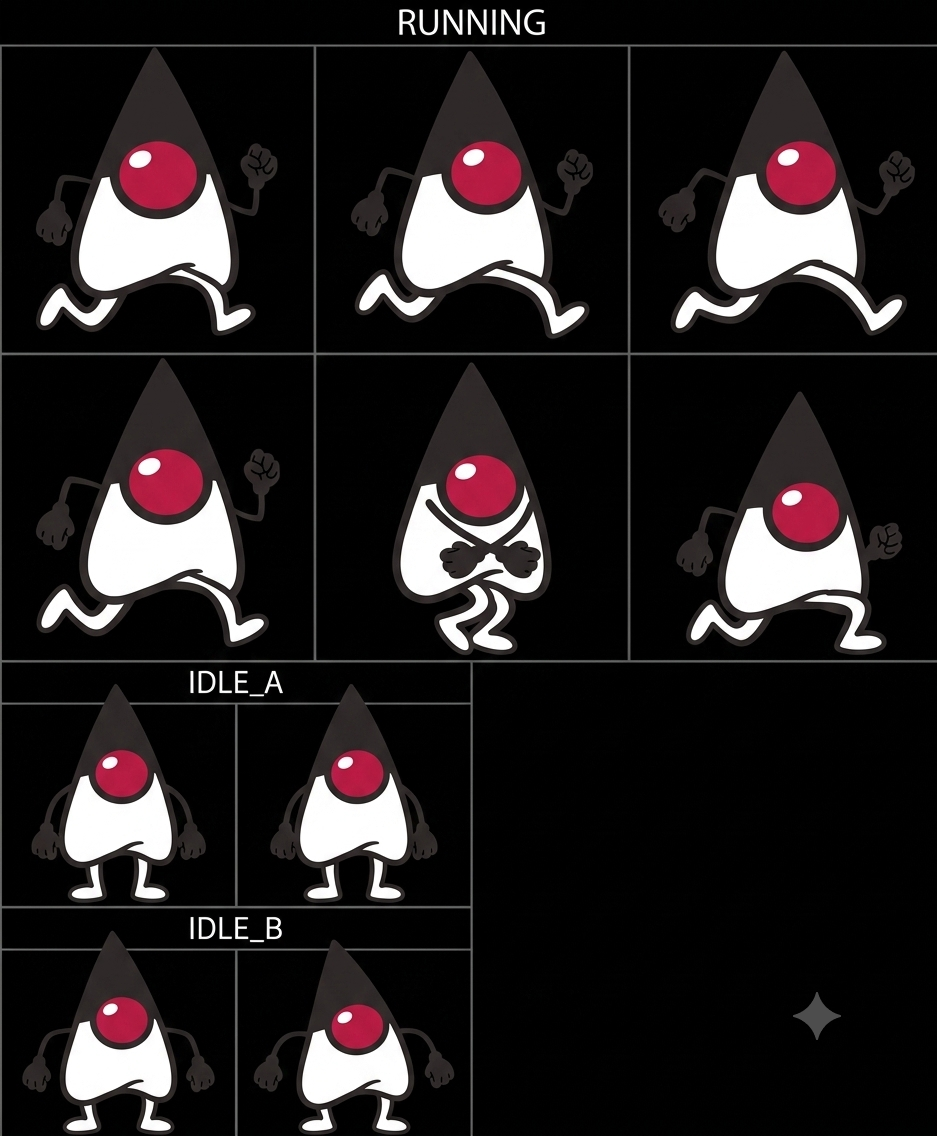
A SpriteSheet in Codename One needs a clean grid of equal-sized frames with a transparent background, so a sheet like this needs a one-time prep pass: crop out the RUNNING frames, make the black background transparent, and lay them out evenly. The result is a tidy horizontal strip:

Now wire it up as an asset. Sprite sheets carry a little metadata (frame size + rate), so add an entry to a pack JSON (or edit the bundled /gamebuilder-packs.json):
{ "id": "player", "name": "Duke", "kind": "actor",
  "type": "sheet", "source": "duke_run.png",
  "frameW": 269, "frameH": 312, "frames": 5, "fps": 12,
  "w": 42, "h": 48, "unique": true,
  "defaults": { "lives": 3, "jumpHeight": 110 } }
type: "sheet" plus frameW/frameH tell the runtime to slice duke_run.png into frames and play them as an AnimatedSprite; w/h are the on-screen size (the big 269×312 frames are scaled down to a 42×48 sprite). Static images (coffee.png, exception.png) need no metadata — type defaults to image. Plain images you can also bring in with the Asset Library’s Import button, which copies the file into games/assets/ and adds it to a Custom pack for you; sheets and meshes use the file-plus-pack-entry route above. With the art in place, the Asset Library now shows Duke, coffee and the exception monster ready to stamp down.
Step 2 — Paint the ground
Select the Terrain layer, pick the Grass tile, and drag across the bottom row. Why a tile layer? Tiles are a compact grid of assetId-per-cell — perfect for a floor of identical blocks — and the runtime batch-renders them, so a long floor costs almost nothing. Leave a gap or raise a few tiles to make a ledge to jump.

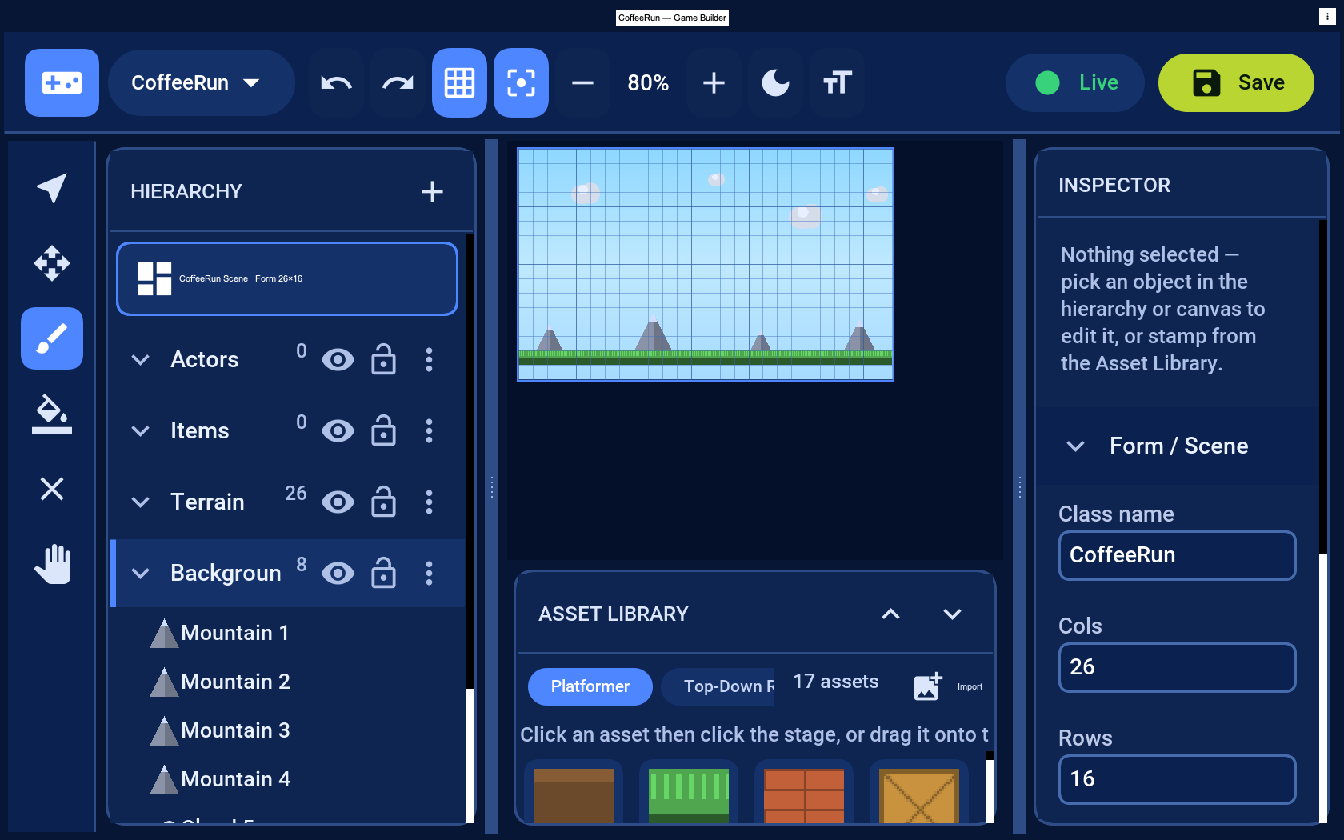
Step 3 — A parallax background (clouds and mountains)
The bottom Background layer scrolls slower than the rest — a real parallax effect that gives the scene depth. Select it, then paint Mountain along the horizon and a few Cloud tiles up in the sky. This isn’t a painted-on trick: every layer carries its own parallax factor (the Background layer ships at 0.4), and the renderer offsets each layer by camera × factor, so distant tiles drift behind the action as the camera follows the player. A parallax layer is decoration — its tiles never block the player, unlike the solid Terrain.
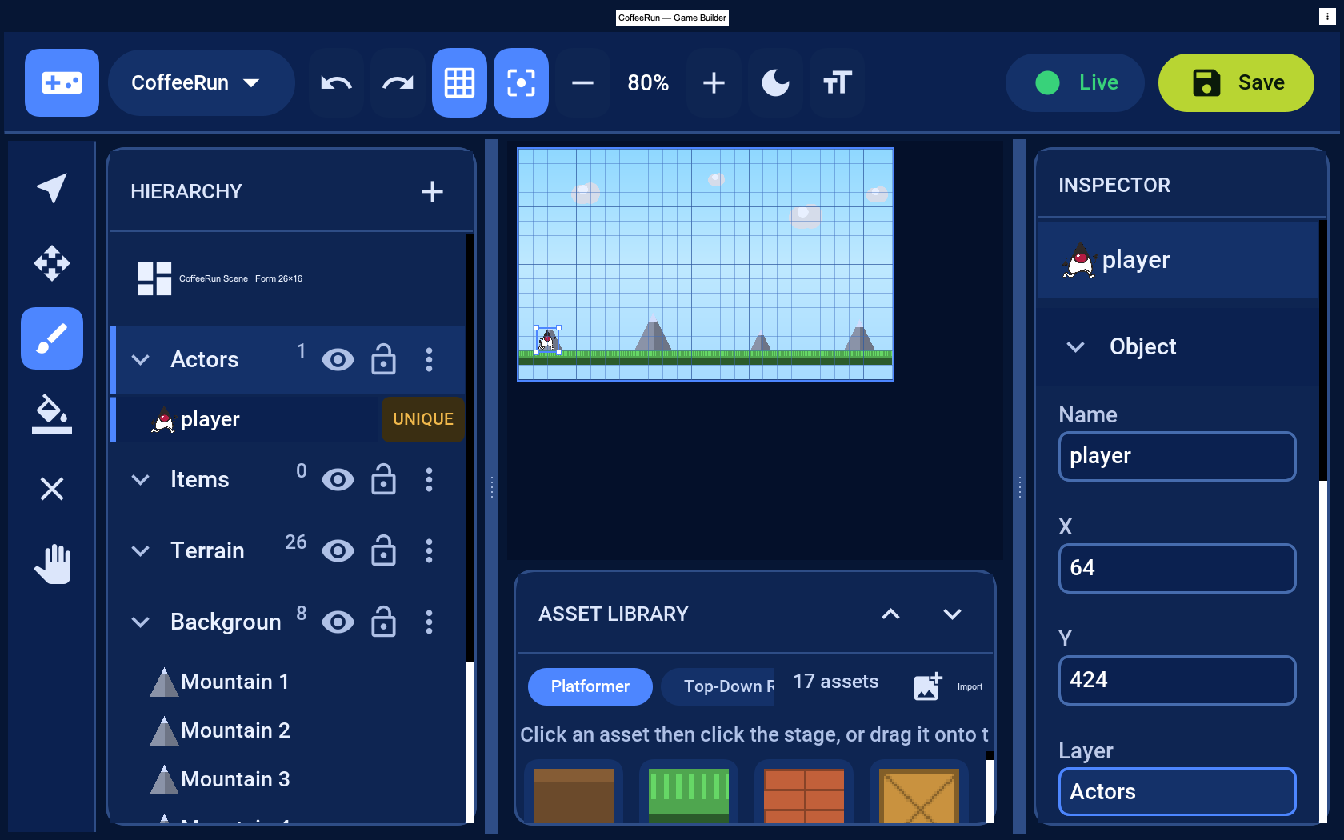
Step 4 — Place Duke and give him behavior
Select the Actors layer, pick Duke, and click where he starts. Actors are freely positioned objects (not grid-snapped like tiles), because a character lives at an arbitrary point and moves smoothly. Give him the Name player (the editor turns each named object into a field you can use in code — and the built-in arcade behavior treats the player asset as the hero), then open the Inspector’s Behavior section and set the numbers your code reads: lives = 3 and jumpHeight = 110. Use Add property for any custom field — these are just typed key/value pairs stored with the object. Because Duke is a sprite sheet, he runs as an animation the moment you press Live.
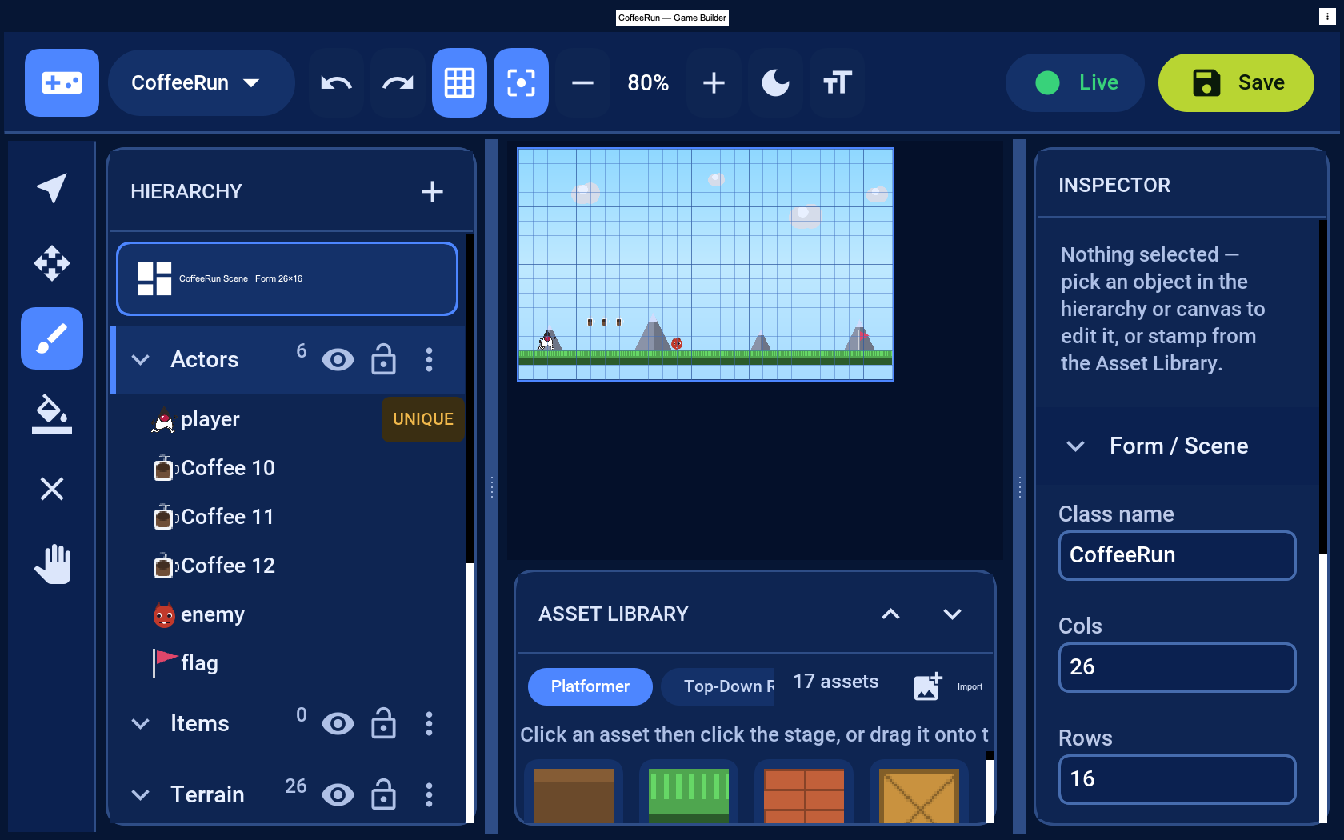
Step 5 — Scatter coffee cups to collect
Pick Coffee and stamp three above the floor. Give each a value (say 10) in its Behavior section — that’s the score it’s worth. Coffee is the task: the reason to dash across the level. The built-in arcade behavior collects a cup on contact and adds its value to the score, so you can test immediately.

Step 6 — Add an exception monster and a goal
A game needs stakes and an end. Pick Exception — a roaming bug-monster — and place it on the floor to the right; give it speed = 45 so it patrols. Then pick Flag and place it at the far edge — reaching it is winning. Now the level has a loop: dash right, grab coffee, time your jump past the exception, touch the flag.

Step 7 — Scene-wide rules
Deselect everything to edit the whole level. In the Inspector set Gravity (try 9.8) and the Background (Sky). Gravity is a level property the platformer physics reads — raise it for a heavier, snappier feel, lower it for floaty moon-jumps.
Step 8 — Play it
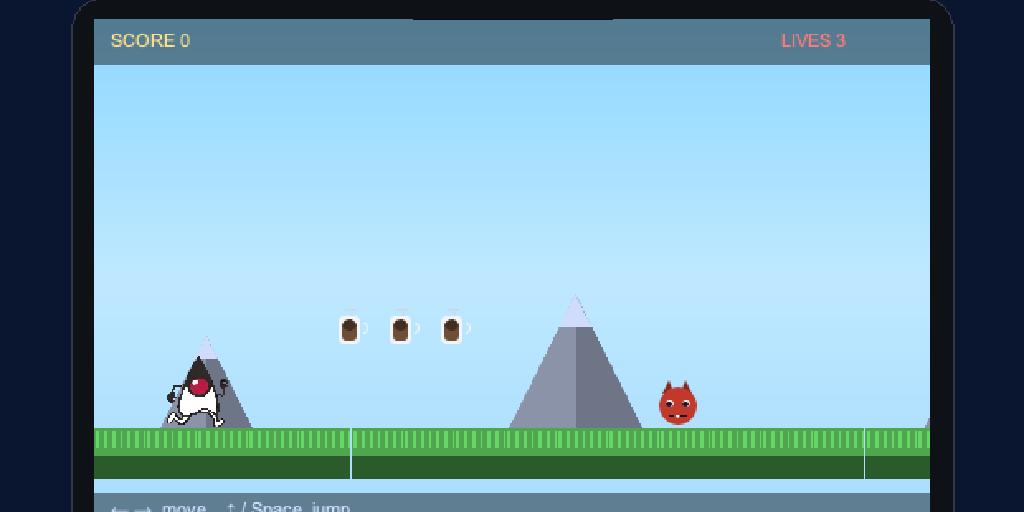
Press Live. Move with the arrow keys, Up / Space to jump. Duke’s run cycle animates, gravity and tile collision are simulated, coffee cups add to the SCORE, and the exception monster patrols. Stop returns to editing — playing never mutates your level.
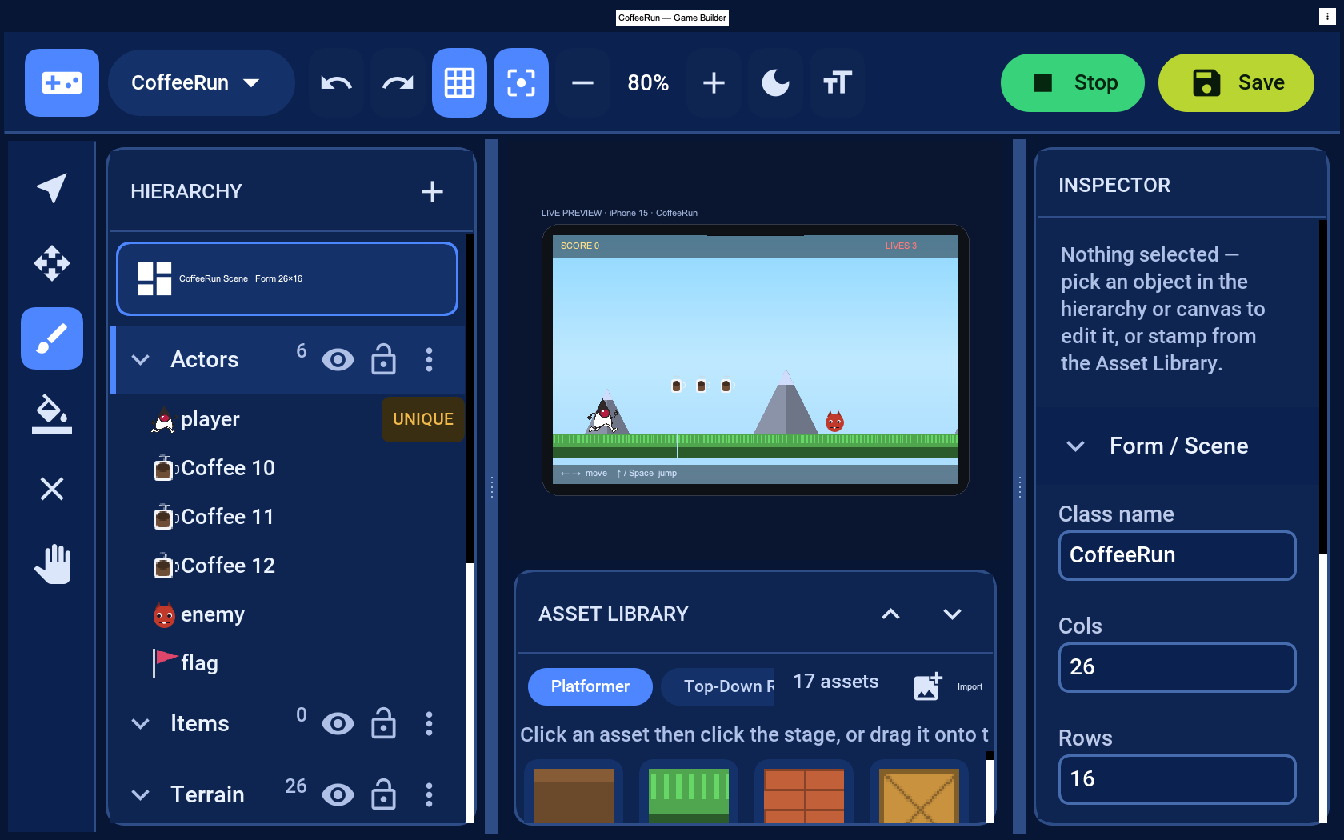
The same level, live in the preview — Duke dashes right, hops the exception monster, grabs the coffee:
What just got saved? The .game file
Save writes the level to src/main/resources/games/CoffeeRun.game. It’s plain JSON — readable, diff-able, and yours to ship as a resource. (Codename One’s resource namespace is flat, so at runtime you load it as /CoffeeRun.game, not /games/CoffeeRun.game — the games/ folder just keeps your sources tidy.) A trimmed version:
{
  "mode": "2d", "cols": 26, "rows": 16, "tileSize": 32,
  "props": { "gravity": 9.8, "background": "Sky" },
  "layers": [
    { "name": "Background", "kind": "entity", "band": 0, "parallaxX": 0.4, "parallaxY": 0.6 },
    { "name": "Terrain", "kind": "tile", "band": 1, "tiles": { "0,14": "grass", "1,14": "grass" } },
    { "name": "Items",  "kind": "entity", "band": 2 },
    { "name": "Actors", "kind": "entity", "band": 3 }
  ],
  "elements": [
    { "id": "e1", "assetId": "mountain", "name": "mountain", "layer": "Background",
      "x": 300, "y": 361, "scaleX": 1.45, "scaleY": 1.45, "scaleZ": 1.45 },
    { "id": "e2", "assetId": "player", "name": "player", "layer": "Actors", "x": 64, "y": 416,
      "props": { "lives": 3, "jumpHeight": 110 } },
    { "id": "e3", "assetId": "coffee", "layer": "Actors", "x": 160, "y": 384, "props": { "value": 10 } },
    { "id": "e4", "assetId": "exception", "name": "enemy", "layer": "Actors", "x": 352, "y": 416, "props": { "speed": 45 } },
    { "id": "e5", "assetId": "flag",  "name": "flag",  "layer": "Actors", "x": 768, "y": 416 }
  ]
}
The player element points at the player asset (our Duke sprite sheet); the named objects (mountain, player, enemy, flag) become the generated fields below; the Background layer’s parallaxX/parallaxY are what make it drift.
Nothing is hard-coded into Java. To re-edit, run mvn cn1:gamebuilder again — the editor rewrites this file and preserves your code.
Loading and showing the game
create-game-scene generated the companion class. The part between the DO NOT EDIT markers loads the .game resource and wires every object you named in the editor to a field — because you named the player player, the editor generated a player field and even seeded lives from its property. The constructor and onUpdate are yours:
public class CoffeeRun extends GameSceneView {
    public CoffeeRun(AssetCatalog catalog) {
        super(loadLevel(), catalog);   // realizes the level into a Scene of Sprites
        initScene();
        setArcadeBehavior(true);       // built-in run/jump/gravity/patrol/pickups (2D)
    }

    //-- GAMEBUILDER GENERATED - DO NOT EDIT BELOW
    /// The "player" object you placed in the editor (Duke).
    protected Sprite player;
    /// The "enemy" object you placed in the editor.
    protected Sprite enemy;
    /// The "flag" object you placed in the editor.
    protected Sprite flag;
    private static GameLevel loadLevel() {
        try {
            return GameLevel.load(Display.getInstance().getResourceAsStream(CoffeeRun.class, "/CoffeeRun.game"));
        } catch (java.io.IOException err) {
            throw new RuntimeException("failed to load level /CoffeeRun.game", err);
        }
    }

    private void initScene() {
        player = findByName("player");
        enemy = findByName("enemy");
        flag = findByName("flag");
        if (player != null) {
            setLives(elementOf(player).getInt("lives", 3));
        }
    }
    //-- GAMEBUILDER GENERATED - DO NOT EDIT ABOVE

    @Override
    protected void onUpdate(double deltaSeconds) {
        // your game logic — see below
    }
}
You don’t write findByName/setLives yourself — the editor regenerates that block every time you save, so renaming or adding objects in the Inspector just updates your fields. The setArcadeBehavior(true) call is the important one: for a 2D scene the editor turns on the same gravity, run, jump, patrol and pickup behavior you play-tested in the preview, so the generated game is playable before you write a line of logic. (More on opting out below.)
GameSceneView is a GameView (a Codename One Component), so you show it like any other and start() its loop:
public class CoffeeRunApp {
    public void start() {
        Form f = new Form("Duke's Coffee Run", new BorderLayout());
        CoffeeRun game = new CoffeeRun(StarterAssets.catalog());   // your AssetCatalog
        f.add(BorderLayout.CENTER, game);
        f.show();
        game.start();                                          // begins the game loop
    }
}
That’s a complete, playable game already — the floor, coffee, exception monster and flag are live sprites, and because the constructor called setArcadeBehavior(true) Duke runs (animated), jumps and falls, the exception patrols, and coffee scores on contact. Everything after this is your rules.
Preview, runtime, and the arcade behavior
One thing worth being precise about, because it trips people up: the editor’s Live preview and a shipped GameSceneView are two different runtimes. The preview is a play-test simulator built into the editor; a shipped game is your companion class. So a bare GameSceneView does nothing automatically except realize the level and call your onUpdate each frame — it has no built-in gravity or movement of its own.
What makes them match is setArcadeBehavior(true). It enables, at runtime, the exact behavior the preview shows:
- Gravity from the level’s
gravityproperty and run (Left/Right) atwalkSpeed. - Jump (Up / Space / Fire) using the player’s
jumpHeight, with tile collision against the solid Terrain (parallax background layers don’t block). - Enemy patrol for every
exception/slime/enemy*/npc*, turning at walls. - Pickups: touching a
coffee/coin/gem/star/tokenscores itsvalue; touching an enemy costs a life. - A follow camera that scrolls to keep the player in view (which is what makes your parallax background drift).
Every one of those is a protected method you can override — updatePlayer, updateEnemies, onPickup, onPlayerHit, isCollectible, isEnemy, isSolidAt — so “overriding defaults” means override the hook (or call setArcadeBehavior(false) and do everything yourself). And GameSceneView hands you the small helpers every loop needs, so you never re-roll them: findByAsset(id)/findByName(name) locate a sprite, findAllByAsset(id) returns every match, elementOf(sprite) reads its editor properties, overlaps(a, b) is a null-safe collision test, and addScore/getScore/loseLife/getLives/isGameOver track game state.
Your rules — winning, power-ups, and death
The arcade behavior already runs Duke’s movement, the coffee pickups and the exception monster, so your onUpdate only has to add what the engine can’t know: the win condition. Reaching the flag wins:
private boolean won;

@Override
protected void onUpdate(double deltaSeconds) {
    if (player == null || won) {
        return;
    }
    if (overlaps(player, flag)) {   // reach the goal you named "flag"
        won = true;
        youWin(getScore());
    }
}
Everything else is a one-method override of an arcade hook — that’s the whole point of “overriding defaults.” A power-up is just an onPickup that branches on the asset id; return false to keep an item in the world, true to consume it:
@Override
protected boolean onPickup(Sprite item) {
    GameElement el = elementOf(item);
    switch (el.getAssetId()) {
        case "gem"   -> { addScore(el.getInt("value", 50)); return true; }   // bonus
        case "star"  -> { invincibleUntil = time() + 5; return true; }       // power-up
        default      -> { return super.onPickup(item); }                     // coffee: default scoring
    }
}
Hit, HP and respawn live in onPlayerHit. The default costs one life and respawns at the start; override it for hit points, invulnerability frames, a checkpoint, or a death screen:
private int hp = 3;
private double checkpointX, checkpointY;

@Override
protected void onPlayerHit(Sprite enemy) {
    if (time() < invincibleUntil) {
        return;                       // a star makes you immune
    }
    if (--hp > 0) {
        player.setPosition(checkpointX, checkpointY);   // back to the last savepoint
    } else {
        loseLife();                   // out of HP: lose a life (GameSceneView counts them)
        hp = 3;
        if (isGameOver()) {
            showDeathScreen();
        }
    }
}
A checkpoint is just a collision branch in onUpdate that records where to respawn — if (overlaps(player, flag)) { checkpointX = player.getX(); ... }. None of this is framework ceremony: it’s reading the numbers you set in the editor and calling the same loseLife/isGameOver/addScore helpers the engine uses.
Because you edit onUpdate and overrides — not the generated block — re-running cn1:gamebuilder to tweak the level keeps this logic intact.
Physics, effects and overriding defaults
The starter movement is lightweight arcade physics. When you want more, the gaming API has the real thing — here are concrete drop-ins.
Real rigid-body physics (Box2D). Swap the arcade jump for an actual physics world: gravity, stacking, slopes, and bounce. A PhysicsBody linked to your sprite writes its transform back into the sprite on every step:
import com.codename1.gaming.physics.PhysicsWorld;
import com.codename1.gaming.physics.PhysicsBody;
import com.codename1.gaming.physics.BodyType;

private PhysicsWorld physics;
private PhysicsBody body;

private void enablePhysics() {                                 // call once, after the level loads
    physics = new PhysicsWorld(0, (float) (getLevel().getDouble("gravity", 9.8) * 100));
    physics.createBox(0, getHeight() - 16, getWidth(), 16, BodyType.STATIC);   // the floor
    body = physics.createBox((float) player.getX(), (float) player.getY(), 24, 32, BodyType.DYNAMIC);
    body.setLinkedSprite(player);                              // step() drives the sprite
}

// in onUpdate:
physics.step((float) deltaSeconds);
if (getInput().wasKeyPressed(Display.GAME_FIRE)) {
    body.applyLinearImpulse(0, -400);                          // jump
}
Sound and effects. Add a little juice by overriding onPickup — the gaming API ships a low-latency SoundPool:
private final SoundPool sound = SoundPool.create(8);
private SoundEffect sipSfx;                                    // sipSfx = sound.load("/sip.wav");

@Override
protected boolean onPickup(Sprite item) {
    sound.play(sipSfx);                                       // slurp!
    int shake = (int) (Math.random() * 5 - 2);                // a one-frame screen-shake
    getScene().setCamera(shake, shake);
    return super.onPickup(item);                              // keep the default scoring
}
Opting out entirely. The arcade behavior is a convenience, not a constraint. Don’t want it? Call setArcadeBehavior(false) (or delete it from the constructor) and drive everything from onUpdate — poll getInput().isGameKeyDown(Display.GAME_RIGHT) and move the player sprite yourself. You can also keep the behavior but replace one piece by overriding a single hook (updatePlayer, updateEnemies, …) — the rest still runs.
Menus, HUD and pause
This is the part most game engines make painful and Codename One makes trivial: the menus. A GameSceneView is an ordinary Codename One Component, so the entire Codename One UI toolkit — Form, Toolbar, Dialog, layouts, CSS theming, animations — is right there around your game. The level select, the pause screen, the settings page, the score HUD: all of it is the same UI API you’d use for any app, not a bespoke game-UI framework you have to learn.
A score/lives HUD is just a label laid over the game:
Form f = new Form("Duke's Coffee Run", new BorderLayout());
Label hud = new Label("Score 0   Lives 3");
f.add(BorderLayout.NORTH, hud).add(BorderLayout.CENTER, game);
// update it each frame from onUpdate via callSerially:
hud.setText("Score " + getScore() + "   Lives " + getLives());
A pause menu is a one-line Dialog over the frozen game:
game.stop();                                                   // freeze the loop
Command resume = new Command("Resume");
Command quit = new Command("Quit to menu");
if (Dialog.show("Paused", "Score: " + game.getScore(), resume, quit) == resume) {
    game.start();
} else {
    showLevelMenu();
}
And a level-select screen is a themed Form with a real toolbar — the kind of polish that’s a slog elsewhere:
Form menu = new Form("Duke's Coffee Run", BoxLayout.y());
menu.getToolbar().addCommandToRightBar("Settings", null, e -> showSettings());
for (String level : new String[] {"CoffeeRun", "Caverns", "SkyRun"}) {
    Button play = new Button(level);
    play.addActionListener(e -> startLevel(level));            // loads /<level>.game
    menu.add(play);
}
menu.show();
Because it’s all standard Codename One UI, your menus inherit your app’s theme, your fonts, right-to-left support, accessibility and the simulator’s live preview — for free.
The finished game and where to go next
You now have Duke’s Coffee Run: real animated art, a drawn level, an enemy, a goal, and a handful of lines of rules. Natural next steps:
- More levels — ship many
.gamefiles and load whichever the player picks from the level-select screen above; the companion pattern is identical. - Use Duke’s idle animation — you also downloaded
duke_idle.png; swap Duke’s sheet to it when he’s standing still, the same way you wired the run cycle. - Smarter enemies — read a
patrolrange orbehaviorproperty per exception monster and branch inonUpdate. - Hazards — the Spike tile and a
damageproperty make instant-death floors.
Next: Tutorial 2 — a turn-based board game, where Duke trades the coffee dash for a strategy board — and the same data-plus-onUpdate pattern drives game rules instead of arcade motion.