In Tutorial 1 Duke dashed for coffee with arcade physics. Now he sets the cup down for a calmer contest: Duke Jack, a game of blackjack. A card game has none of that arcade motion — cards sit on the felt and the rules decide who wins. This tutorial shows how the same Game Builder pattern (visual data + an onUpdate companion) handles a card game, where your code reads the cards and runs the table instead of simulating movement. We’ll build a felt table, deal a real hand, and wire up the complete blackjack rules: hit, stand, the dealer’s draw, and the win/lose decision.
If you haven’t set up a project yet, the project setup in Tutorial 1 applies verbatim — only the mode changes (board mode isn’t the default, so the -Dmode=board flag is required here):
mvn cn1:create-game-scene -DclassName=com.example.dukejack.DukeJack -Dmode=board
mvn cn1:gamebuilder
Why board mode for cards?
Board mode is the Game Builder’s grid mode: you place elements on a flat board of cells instead of a free-scrolling world. That’s a natural fit for a card table — the felt is a tile layer, and each card is an element you position by hand, carrying its own rank, suit and faceUp data. There’s no physics and no camera to chase; the layout is the game state, and your rules read it. (Board mode can also tilt the grid into an isometric view through IsoProjection for tabletop games — for cards we keep it flat and top-down.)
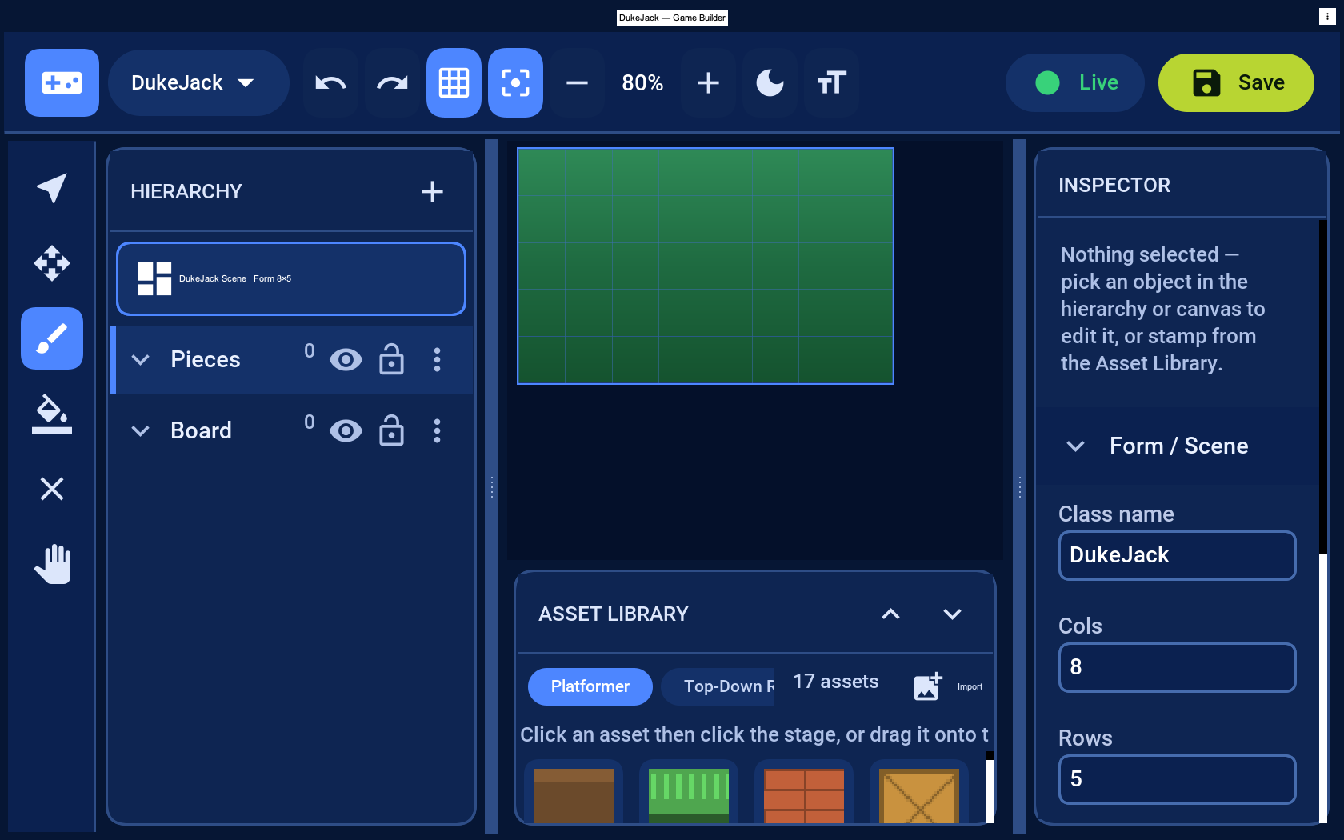
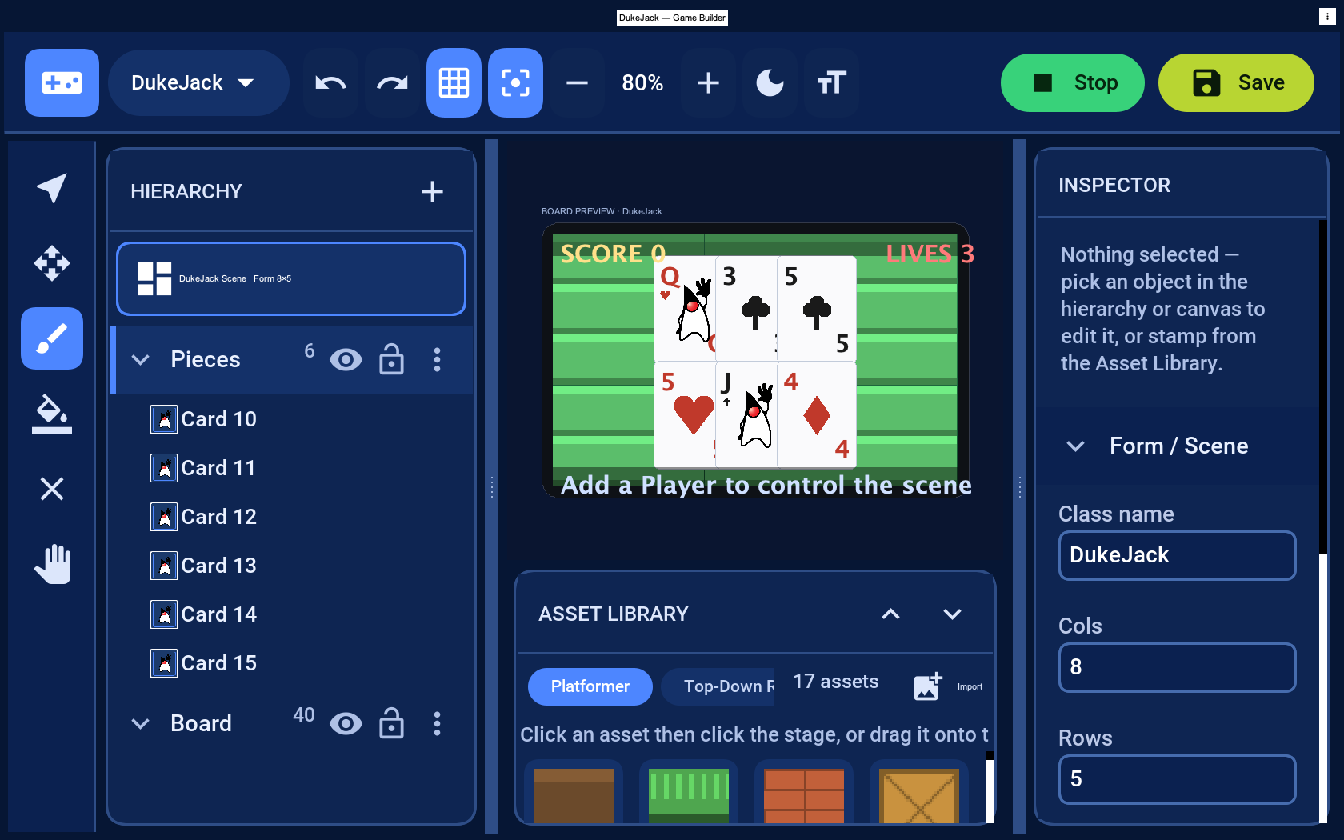
Step 1 — A card-table scene
Pick New scene → Board. You get a Board (tile) layer for the table surface and a Pieces (entity) layer for the cards. Keeping the felt and the cards on separate layers matters: the felt is static grid data, while the cards are objects your rules deal, flip, and clear. A small grid (here 8×5) is all a card table needs.
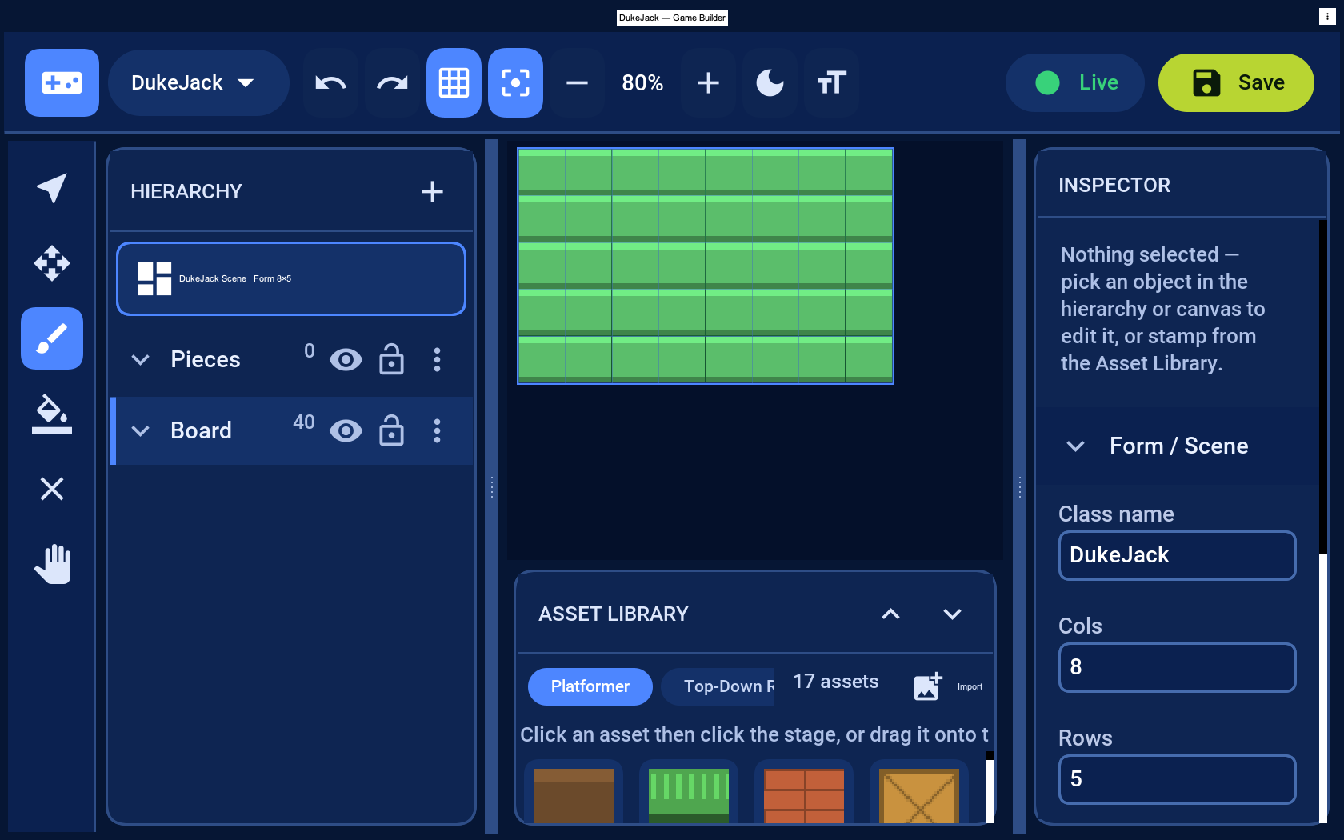
Step 2 — Lay the felt
Select the Board layer, pick the green tile from the palette, and paint the whole grid. That green surface is your table; everything else sits on top of it.
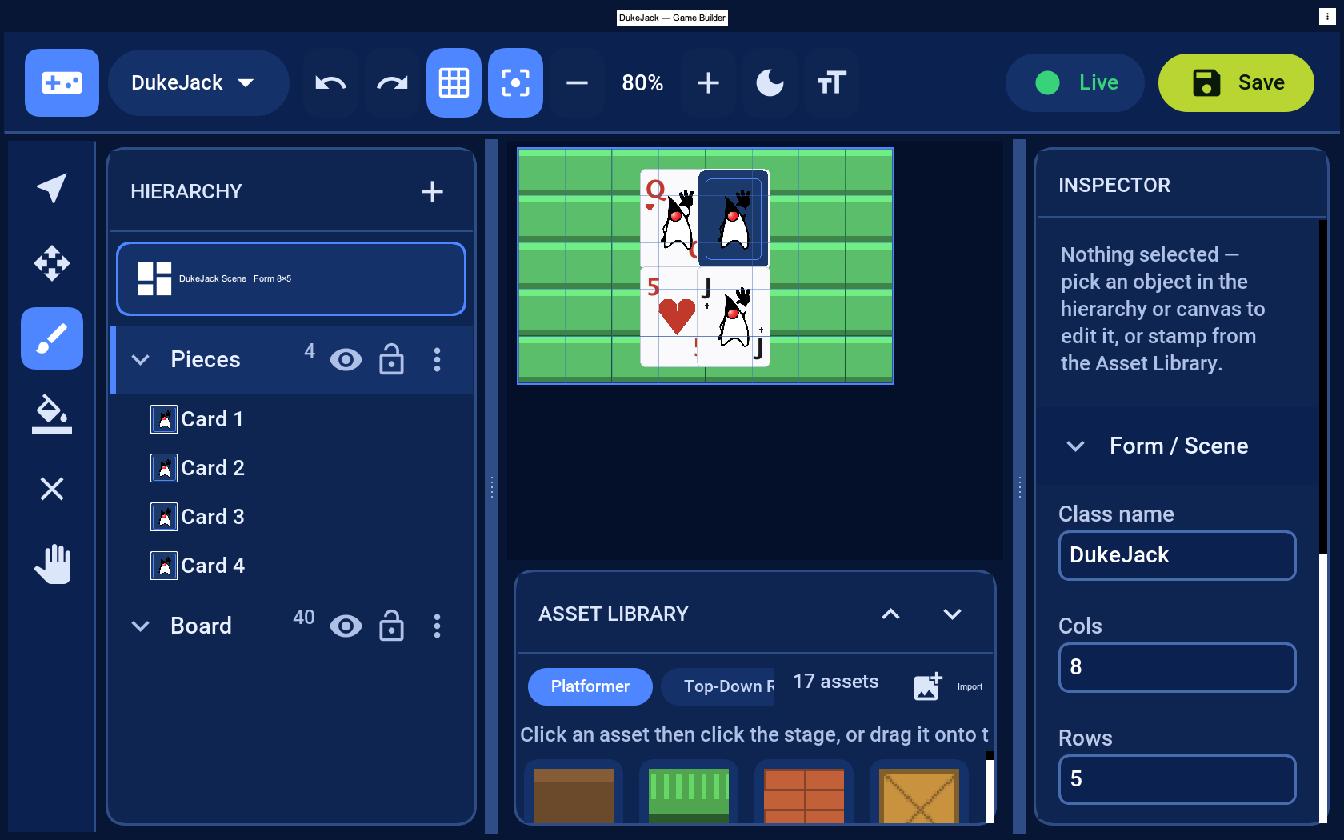
Step 3 — Deal the hands
Switch to the Pieces layer and place Card actors: a row for the dealer along the top and a row for Duke along the bottom. Each card carries three properties in the Inspector — rank (A, 2…10, J, Q, K), suit (Spades / Hearts / Diamonds / Clubs) and faceUp. Turn the dealer’s second card face-down — that’s the hole card the player can’t see yet.
You can place cards by hand for a fixed layout, but a real game deals them from a shuffled deck at runtime — your companion creates the card elements from the engine below. The editor just lets you design the table, the card art and the seating; the deal is data your code produces.
Step 4 — Hit or stand
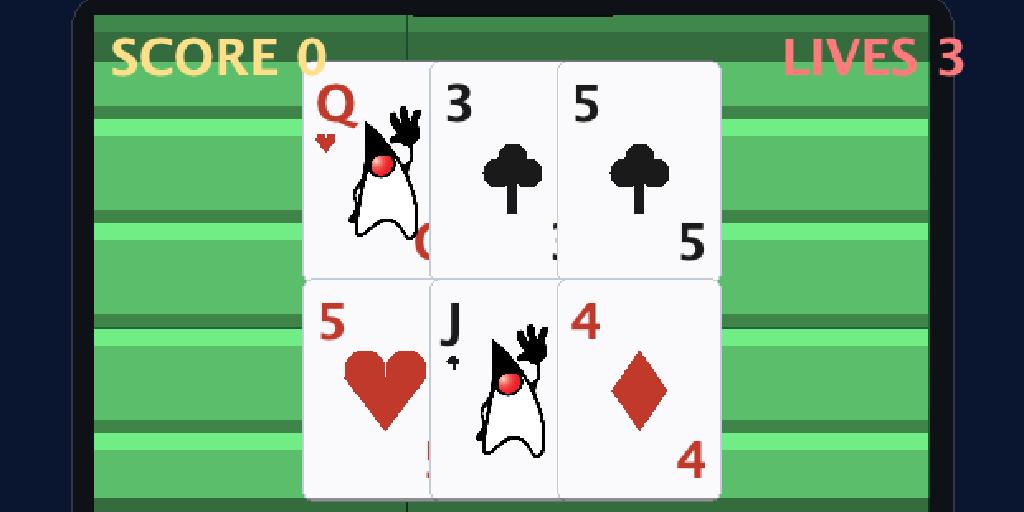
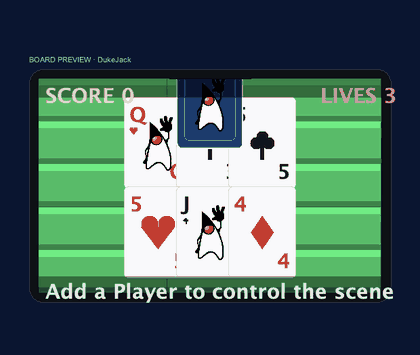
Duke’s hand here is on 15 (and his Jack already wears the Duke mascot) — too low to stand on. He hits, and a third card brings him to 19, a total worth standing on. The companion spawns the new card element and lays it next to the others; the same faceUp/rank/suit data drives how it draws. The dealer’s hole card stays face-down — it’s still Duke’s turn.

Where the card art comes from
Let’s be exact about this, because “the faces are generated” explains nothing. There is no card generator in the framework. Your companion class draws each card itself with the ordinary Graphics API — the same one you’d use to custom-paint any Codename One component. When a card needs to be shown, your code is handed a Graphics and a rectangle and decides what goes in it.
A card element holds just two fields, rank and suit. One short method in your game turns that into a card — this is the actual routine the preview above uses:
void drawCard(Graphics g, int x, int y, int w, int h, String rank, String suit, boolean faceUp) {
    if (!faceUp) {                                  // the back: a blue card with the Duke mascot
        g.setColor(0x1B3A6B);
        g.fillRoundRect(x, y, w, h, 8, 8);
        g.drawImage(duke, x + (w - dw) / 2, y + (h - dh) / 2, dw, dh);
        return;
    }
    g.setColor(0xFFFFFF);                           // the face: a white card...
    g.fillRoundRect(x, y, w, h, 8, 8);
    g.setColor(isRed(suit) ? 0xC0392B : 0x1A1A1A);
    g.drawString(rank, x + 4, y + 4);               // ...rank in the corner...
    if (isFaceCard(rank)) {
        g.drawImage(duke, x + (w - dw) / 2, y + h / 4, dw, dh);   // Duke on the J, Q and K
    } else {
        drawSuitPip(g, x + w / 2, y + h / 2, suit);  // ...or a suit symbol in the middle
    }
}
duke here is the Duke mascot — the classic waving Duke (the BSD-licensed Java mascot), bundled with the game as an editable image. He rides the card back and every picture card (Jack, Queen, King), which is what actually makes it Duke Jack. The number cards are a rank label plus a drawn suit shape, so two pieces of art — the Duke image and the four suit symbols — cover the entire 52-card deck; everything else is text the code positions.
So, to answer “is it an image or is it drawn?” — both, and your code decides the mix:
- Drawn from data (the default). Cheapest by far: one method, two images, 52 cards, and you restyle the whole deck by editing that method. To change the back, swap the Duke image or draw something else in the
!faceUpbranch. - Fully painted cards. Prefer a hand-illustrated King of Hearts? Import 52 images named by rank and suit and
g.drawImagethe matching one — it’s the same method with a different branch.
Either way it’s plain drawing code living in your companion class, not a black box you have to accept as-is.
And that’s the quietly powerful part of building games this way. drawCard isn’t using some games-only drawing layer — it’s the very same Graphics API Codename One has painted every button, label and chart with for fourteen years. A GameView is an ordinary Codename One Component, so the entire mature graphics stack works inside your game: Image.createImage(w, h, argb) mutable-image buffers you draw a sprite into once and reuse, anti-aliased shapes, system fonts, affine transforms, even the chart and SVG libraries. The new gaming API didn’t replace any of that — it plugged into it. So a “new” thing (a card game, a 3D dungeon) is really fourteen years of battle-tested API and tooling pointed at a game scene; the card faces here are just the smallest, clearest example of it.
The rules: a blackjack engine
The cards are just data; the game is the rules that read them. Here is a complete, self-contained blackjack engine — no Codename One dependency, so you can drop it straight into your companion (or unit-test it on its own). The only subtlety in blackjack is the Ace, which is worth 11 unless that would bust the hand, in which case it drops to 1:
public int handValue(List<Card> hand) {
    int total = 0, aces = 0;
    for (Card c : hand) {
        total += c.value();           // face cards 10, Ace 11 (for now)
        if (c.isAce()) aces++;
    }
    while (total > 21 && aces > 0) {  // soften Aces until we stop busting
        total -= 10;
        aces--;
    }
    return total;
}

public void hit() {                   // player draws
    player.add(draw());
    if (handValue(player) >= 21) stand();   // 21 stands, a bust ends the round
}

public void stand() {                 // player done — dealer plays, then settle
    if (handValue(player) <= 21) {
        while (handValue(dealer) < 17) dealer.add(draw());   // dealer hits below 17
    }
    settle();
}

private void settle() {
    int p = handValue(player), d = handValue(dealer);
    if (p > 21)                                   outcome = DEALER_WIN;   // player bust
    else if (isBlackjack(player) && !isBlackjack(dealer)) outcome = PLAYER_BLACKJACK;
    else if (d > 21 || p > d)                     outcome = PLAYER_WIN;   // dealer bust / higher
    else if (p < d)                               outcome = DEALER_WIN;
    else                                          outcome = PUSH;         // equal totals
}
The deck is a shuffled list of 52 Cards (rank 1–13, suit 0–3); draw() pops the next one. A two-card 21 is a natural that wins immediately and pays before the dealer draws. That’s the whole game — everything else is presentation.
Wiring it into the companion
The companion is the same shape as Tutorial 1 — a GameSceneView with a generated loadLevel() and your onUpdate. You deal in onSetup, then read taps (or on-screen Hit / Stand buttons) and turn them into engine calls, re-laying the card elements after each move:
private final Blackjack game = new Blackjack(new Random());

@Override
protected void onUpdate(double deltaSeconds) {
    GameInput in = getInput();
    if (game.phase() == Blackjack.Phase.PLAYER_TURN && in.wasPointerPressed()) {
        // tap the top half of the screen to hit, the bottom half to stand
        if (in.getPointerY() < getHeight() / 2) game.hit();
        else                                    game.stand();
        layoutCards();                          // re-place the card sprites from the hands
        if (game.phase() == Blackjack.Phase.DONE) {
            Dialog.show("Duke Jack", game.resultText(), "Deal again", null);
        }
    }
}
layoutCards() is the bridge from rules to pixels: clear the old card sprites and, for each card in game.dealerHand() and game.playerHand(), place a card element with that rank/suit (and the dealer’s hole card face-down until game.phase() leaves PLAYER_TURN). Because cards are just elements, dealing, hitting and clearing the table are the same add/remove operations you used for coins in Tutorial 1.
Play it
Press Live. The table comes up, Duke stands on his 19, and the dealer turns over the hole card and draws up to 18 — Duke wins the hand:
Dealing a card is just creating its element and sliding it onto the felt:
What got saved, and how it renders
Save writes src/main/resources/games/DukeJack.game (loaded at runtime as /DukeJack.game — Codename One’s resource namespace is flat). The felt and any cards you placed by hand live there as data; the dealt cards are created by your companion at runtime:
{
  "mode": "board", "cols": 8, "rows": 5, "tileSize": 64,
  "layers": [
    { "name": "Board",  "kind": "tile",   "tiles": { "0,0": "start", "1,0": "start" } },
    { "name": "Pieces", "kind": "entity" }
  ],
  "elements": [
    { "id": "d1", "assetId": "card", "layer": "Pieces", "x": 217, "y": 96,  "props": { "rank": "6", "suit": "Hearts", "faceUp": true } },
    { "id": "d2", "assetId": "card", "layer": "Pieces", "x": 295, "y": 96,  "props": { "rank": "2", "suit": "Spades", "faceUp": false } }
  ]
}
A turn-based card game leans even harder on Codename One’s UI than an action game does — and that’s exactly where Codename One shines. A running-total label is a Label in the toolbar; the Hit/Stand controls are two Buttons; the result is a Dialog.show(...) with a “Deal again” option. As Tutorial 1’s menu section shows, all of it is the standard UI toolkit wrapped around your GameSceneView — no separate game-UI layer to learn.
Variations and next steps
The card pattern generalizes to most table games:
- Betting and a bankroll — track chips, pay 3:2 on a natural, and let the player raise before the deal.
- Split and double-down — both are just more engine states over the same hands and card elements.
- Other games — the
Cardelement plus a rules class gives you solitaire, poker or war; only the rules change, the table and the deal don’t. - Multiplayer — deal extra hands as more rows of card elements and loop the turn over them.
Next: Tutorial 3 — a first-person 3D dungeon, where the same data drives a 3D GameView with walls, terrain, lighting, and Duke fighting tea cups with coffee beans.